We have decided to migrate this blog over to our own hosted domain. We will continue our weekly DIY’s, tips, tricks and whatever else we feel like posting at the new blog location! Check it out!!
Nice and Tight…
Tightening the Fitment between the Upper and the Lower
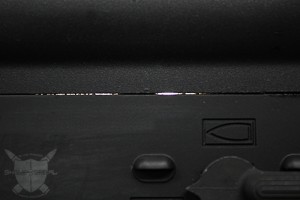
As an AR-15 builder and especially as a builder in the retail market, Shield Tactical has seen just about every mix and match of upper and lower receiver you can imagine. The fit is never the same even when the fit is good. Because of the nature of how the pieces go together and because of the acceptable variances in manufacturing, you will almost never be able to replicate the fitment of a receiver pair.
For example, a customer of ours was so pleased with the way his Spike’s Tactical lower receiver fit on his Bravo Company Manufacturing upper that he wanted to build another gun with the same pair. When the receivers came in, the pieces fit together as well as could be expected from unmatched pair, but they were not as tightly fitting as his original gun.
It is no slight on Spike’s Tactical or BCM. Both are high quality manufacturers that build excellent parts and well within tolerance. In fact, most manufacturers will bias the fit slightly towards loose to ensure fit regardless of the mix. As a military armorer, to be able to swap and mix parts from different manufacturers of the same weapon system is an invaluable characteristic that saves on cost, training time, and reduces the logistical footprint of having to manage and maintain these guns. A Colt lower fitted to a Sabre upper with an FN barrel and CMT parts should have the same relative fit and performance as an FN lower with a Sabre barrel and a Colt upper. So generally speaking, because these parts must fit each other and must do so every time, the manufacturer will be sure there is enough room for pieces to reliably fit together.
Now that isn’t always the case with manufacturers of complete guns, especially in the consumer (non-military, non-LEO) market. LaRue Tactical goes the extra mile and makes sure their guns are built to such exacting tolerances that a new gun will almost certainly need a tap or two from a small hammer and nylon punch to break the takedown pin free. It is that kind of attention to detail that will result in the reputable performance that Mark LaRue’s guns always seem to deliver. Complete manufactured guns will tend to have a more reliably tolerable fit as well as matching finishes and most manufacturers understand that blasting and anodizing of receivers will often need to be done in the same batch in order to have exactly matching finishes. Of course some finishers are so dialed in they can achieve very close finishes in even separate lots. Does that mean your “Frankengun” will not achieve the same performance as an out-of-the-box rifle? Your home built rifle has the same potential for accuracy and consistency that any store bought gun does. The real question is how to harness that potential.
Today’s article will focus on three known methods for shoring up the fit between the upper and lower receivers to reduce the “slop” and maximize the receiver set’s potential for solid accuracy. Though the barrel is really the component that will determine 80% of a gun’s accuracy, the little details will make the ounce of difference necessary when you as a shooter need just a little more. Most average shooters will find that these methods provide little more than an anti-rattle solution. For more accomplished shooters, the difference is still yet hard to measure and can easily be eclipsed by a strong cup of coffee. Nonetheless, when it comes to shooting competitively, hunting for food, or defending life, it is better to have it than to not.
METHOD A: THE ACCU-WEDGE
DPMS Panther Arms sells a “slop solution” in a low cost, easy to install, drop-in device called an accurizing wedge or what most of us have come to know as the “Accu-Wedge.” This small, flexible, and always-colored-red wedge mechanically adds upward and forward tension to the takedown lug. It does not remove the slop, but it certainly dampens it. Installed properly, it dampens quite a bit.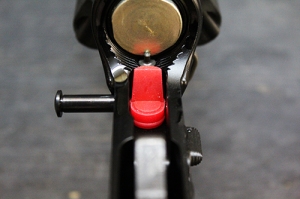
With the Accu-Wedge installed, you can grab the receivers by hand and wiggle the two pieces slowly canting them side to side but shaking them will not yield a rattle like a pair of loose receivers will. Assuming it is installed properly, the upper receiver should not have any more room to move up and down away from the lower, and thus the axis differential between the bore and the stock should remain more consistent during firing resulting in more consistent accuracy. At least, thusly goes the theory, but we have yet to see anything that would prove otherwise.
Whichever benefit you are aiming to achieve, the Accu-Wedge is a good solution and literally takes seconds to install. To moderate any common concerns about its design, the Accu-Wedge does tend to stay in place and rarely falls out of the gun. But, in the case that it does not fit snugly inside the lower receiver, you may want to opt for a different solution. Otherwise, the Accu-Wedge can be quickly modified with a sharp knife to fit receivers where the device does not allow enough room to close the gun. The longer you use the Accu-Wedge the more “nested” it will become as it conforms to the shape of both the trigger control pocket of the lower receiver and the takedown lug. In the case that it does wear out, replacing it is as easy as pulling out the old one and dropping in a new.
METHOD B: TENSIONING SCREW
Mega Arms LLC introduced their tensioning screw on their GATOR lower receiver and it is now featured on everything from their GTR series billet lowers to their MA-TEN series .308 lowers. It is an integrated feature that allows the AR user to introduce vertical tension between the lower receiver and the upper receiver’s takedown lug, just like the Accu-Wedge. As an included feature, Mega does not charge any perceived extras for this proprietary screw. The aqua-blue-green nylon-tip is designed to be quiet and to provide variable tension on the takedown lug to reduce slop.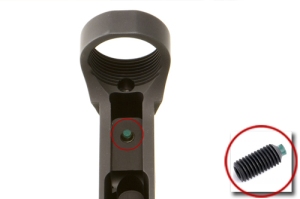
Because of the location of the feature, the only way to access the hex-driven end of the screw is to remove the pistol grip and drive the screw from underneath. This is best done while building the gun prior to installing the pistol grip. It is a good idea however to adjust the screw with a fully built upper as the additional weight will better simulate the required tension. Another issue is that in certain cases the screw may walk just a little and change the amount of tension that was originally set. This is easily solved with a small dab of low strength threadlocker or clear nail polish.
Despite the potential inconveniences the design of this device may pose, the tensioning screw is far more discrete than the Accu-Wedge and is much less likely to get lost. That in itself may be considered a greater convenience to the end user.
METHOD C: JB WELD
Some of you when you read “JB Weld” must have been thinking, “Why in the world would you use JB Weld?!” Read on. I promise it makes sense.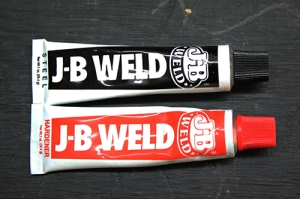
For those of you who don’t know, JB Weld is a two-part epoxy resin and steel adhesive/patch/filler etc. It works exactly the same way as any two-part epoxy cement except that it has steel in it. Incidentally, JB Weld also originates here in Texas so despite the number of existing alternatives, we’re proud to promote the use of this product. There is another version of JB Weld which looks like a stick of putty that comes in two colors. Sorry but this version just won’t work so be sure to buy the JB Weld that comes in twin paste tubes.
Firstly, you’ll need to prep the surface of the receivers to accept the JB Weld. Clean the lower on the top of the receiver with a residue free cleaner like rubbing alcohol or the like. You can clean the whole thing but you really don’t need to. Just clean the curved shelf on top of the receiver just forward of the receiver extension (or buffer tube). You’ll do the same on the upper receiver in the same place. Once both surfaces are clean, take a light grease/oil/wax and wipe a little with your finger on the surface you just cleaned on the UPPER receiver only. The lower you’ll leave cleaned and un-oiled because that is the surface your JB Weld will adhere to.
Next, pin your upper and lower together via the Pivot Pin but don’t close the two halves. Mix up your JB Weld really well and with the end of a toothpick put a small line of JB Weld along the aforementioned and cleaned curve on the top of the receiver in front of the receiver extension. You’ll want to do this while it’s fresh. You really don’t need much, just a tiny bit. Once you’ve got it on there, just let it sit for a few minutes while the top hardens a little.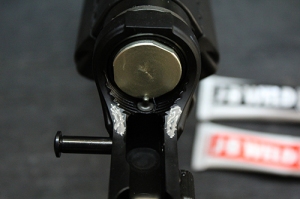
Finally, after 15 minutes or so, close the two halves and engage the takedown pin. Now you’ll need to wait for the JB Weld to harden. Since hardening increases over time, you’ll want to leave it in there for at least a few hours. While it is hardening, set up the rifle such that the lower is fixed in a vice and that the weight of the barrel forces the receivers apart as much as possible. After a few hours have passed, undo the takedown pin and pivot the gun open. You should see two flat surfaces, gray in color, that run along the curves of the lower receiver only. They should be flat along the top. It takes 4 to 6 hours for JB Weld to set and it should be left to sit overnight before using it. Once it is cured, you can color it with an oxyphosphorus bluing solution to match the black of your lower.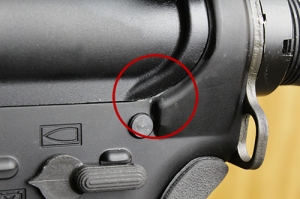
The JB Weld method fills in some of the space in between your two receivers and should mitigate most or all of the slop. You’ll have varying degrees of success based on how you time the drying of the adhesive. The difference between this method and the first two is that the additional pressure comes from the sides and not the middle thereby making the receivers less likely to pivot from side to side. The reason why we run the JB weld along the curve of the receiver is to take up any slack not just from up and down but from back and forth as well. This 10 cent method (or probably less) is great if you don’t mind the unsightly line of JB weld on the INSIDE of your gun and you want your receivers to remain reasonably easier to open in the field.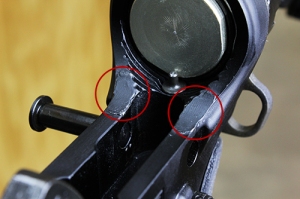
You can get creative with solving the slop problem or even use a combination of methods to fix the ungainly rattle in your AR. I’ve seen folks use everything from lead tape to set screws to big rubber bands. Which leads to one last discussion: do you need to remove the slop at all?
The slop exists because it is inherent in the design of the gun. I doubt that it was intentional but whether it was or not it’s still there. The real question becomes simply this: Is it really a problem at all? Most shooters hardly notice it at all. In this case, ignorance is bliss. If you’re normally shooting your AR from an offhand position and not from a rest, you probably won’t notice any significant gains if at all. If you’re normally running and gunning or using a particular rig for MOUT operations, you definitely won’t notice. Also remember that the additional space in tolerance offers some convenience in that your rifle will often be easier to strip. But if you’ve built a precision AR for competition use or just for a personal challenge, you may look to one or more of these methods to maximize your accuracy. Either way, have fun and happy shooting!
-B Revell
Out of Spec? Or Out of Your Comfort Zone?
One of the more common items of concern we at Shield Tactical often hear about from new builders is the issue of fitment or “spec.” When two pieces don’t go together like they seemingly should, it is easy to conclude that something in the manufacturing is amiss. But if these pieces were simply allowed to fit loosely, how would the wide tolerances affect the performance of the firearm? High performance pieces will usually have very tight tolerances and as a result will usually be stubborn during the installation. As a builder, one should consider whether or not the pieces should go together in a fashion that actually produces a technical advantage or desired characteristic. A builder must expect to encounter at least a little resistance when putting a precision instrument together.
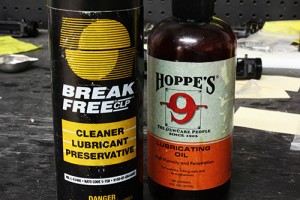
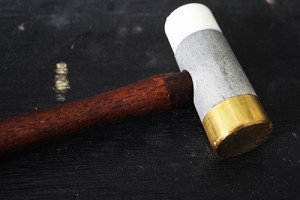
Now granted this goes against everything we were taught about assembly. “Don’t force it.” “Pieces fit together when they should.” They still do. It takes a bit of experience to know how much force is required or how much will be too much. And of course common sense should prevail. The original rule of not forcing the square peg into the round hole still applies. When it comes to the AR-15, little more than a light tapping with a nylon/leather hammer should be required to get any two pieces to fit (with the exception of roll pins of course). Any more than that, and you’ll be using equal or greater force to get the two apart again. And just like any machinist or mechanic will tell you, if it just needs a little more help, lubricate! Yes, you can put lube on a roll pin to help drive it in. Highly recommended as a seized roll pin can be ruined if you try to force it in, and the lower parts kit only came with one! Fortunately for us gun folk, there is usually a bottle of CLP, Hoppe’s, or SLIP2000 lying around nearby.
So when is it appropriate to give it a little extra elbow grease, or when should you pack up the parts and head over to the neighborhood gunsmith?
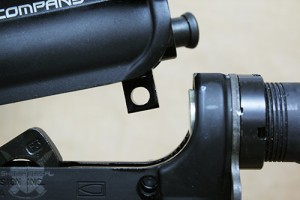
Lewis Machine & Tool (LMT) prefers a tight fitment between the upper and lower receiver. They’re not the only ones either. Most high quality precision manufacturers have opted to fit the upper and lower together with very little space in between and eliminate as much “slop” as possible. This is usually done in consideration of performance in that the tighter fit will help reduce one variable that can affect accuracy. LMT takes things a step further on their MRP (Monolithic Rail Platform) uppers by machining in two small tabs on the underside of the upper receiver. Though the rest of the geometry remains the same, the tabs will protrude down towards the lower and act as a standoff between the two. You’ll see just a little additional airspace between the receivers but the fit will be tight. This results in a common downfall for builders using this MRP upper. If you match the MRP with an LMT lower, you’ll have the highest degree of success mainly because both pieces were built to LMT’s own specifications. Even still, the fitment will likely be tight. All the better to ensure the best accuracy possible. However, if you decide to match that MRP with a lower from a different manufacturer, you will have varying degrees of success as most manufacturers design their pieces to fit to… you guessed it… their own pieces.
We’ve had more than one customer complain about the fitment claiming that the items were “out-of-spec.” And just as many who claimed they had no choice but to file the tabs down so they could put their gun together. Was that the wrong thing to do? Not necessarily. Those tabs constitute a small degree of adjustability for the unlucky few whose receivers do not go together. If I file too much, will the resulting slop cause my rifle to shoot horrible groupings? The AR-15 by design can consistently put together 1.5 MOA groups and many quality barrels will achieve MOA accuracy regardless of that fitment (within reason of course). Now if you went through the trouble and expense of buying a high quality upper like the LMT MRP whose groups should be well below sub-MOA, I’d say it is worth equal consideration to make sure it is built in a manner that maximizes that intended performance. Is the gun ruined? Not by any means, there are ways to tighten the fit between the receivers that anyone can do. Yes there are a few, and we’ll go over those on another day.
Another common issue on some lower receivers is the tolerances of the pivot pin hole. Many builders will encounter a pivot pin hole that is too small. This can be a result of the machining or of the finishing process. Either way the solution is simple. You can try another pivot pin and hope that it was machined just a little smaller, or you can get yourself a .250” reaming bit and the handle from your tap and die set, cover it with cutting oil and SLOWLY turn out the hole until your pivot pin fits.
It is not uncommon for the pivot and takedown pins to fit so tightly that you need a punch and hammer to break them loose. Sometimes that’s even a result of the detents needing to be worn in a little. Oil up the pins and tap them into place. Don’t hammer them in or they’ll seize. If you have to do anything more than tap tap tap them into their hole, stop. If you can get the pins in place and they’re tight that’s great. Just remember that they will loosen up over time and you’ll eventually forget all about how cumbersome it was to take apart your rifle.
The moral of this particular story is simply this. If you are unsure or even don’t know whether or not something is fitting or working properly–ASK! There are plenty of experts around who know their way around these guns, especially the various iterations of the AR-15. If your local gunsmith, gun buddy, or annoying know-it-all acquaintance doesn’t know, chances are the answers are just a short visit to the Internet away. Gun forums are a particularly valuable resource for builders when vexing questions arise. And that leads to the other part of the solution. It’s important to note that no matter how easy these guns go together (typically) there is always variation from brand tobrand or even batch to batch. Rely on an experienced gunsmith to make the decisions on the unknowns. Your safety as a shooter should come first amongst all considerations when building your gun.
-B Revell

